
Anki Tutorial & Guide for Beginners | 80/20 Medical School Anki

Intro
If you want to use Anki, but don’t know where to start, then this guide is for you.
The 80/20 Rule, or Pareto principle, states that 80% of the desired outcome is a result of 20% of the input. For example, 80% of the World’s wealth is owned by 20% of the individuals. This rule also applies to other aspects of life, like learning, business, and farming. In this article, I will provide you with the 20% of the information you need to know in order to master 80% of Anki. For additional information not covered here, see the official Anki Manual.
A few housekeeping items before we begin:
I mention The Anking frequently through this guide because much of what I know about Anki is largely due to him and his team, however, I am not affiliated with them. What I’m providing here is simply a different flavor of Anki tutorial. It goes without saying that The Anking has made a tremendous contribution to mine and others’ medical education. I recommend checking out his YouTube channel here.
At the time of this article, I am using Anki 2.1.55 Qt6. Also, I have a MacBook, so I will use Apple terms and images throughout. If you use a PC, then things will look slightly different. For shortcuts, simply switch ‘command’ to ‘control’.
Lastly, I will use double brackets to denote a shortcut. For example, to copy text from this article to your clipboard, highlight the text and then use {{Cmd+c}}. To discover a shortcut in Anki, hover your mouse over buttons or look next to the option.
Now that that’s out of the way ...
The Basics
In this section we will go over the very basics of how to use Anki.
Windows
Home Screen / Decks {{D}}
This is the main window. When it’s time to study, this is where you go.
Click ‘Create Deck’ at the bottom of the window and name your deck. If you want to have subdecks within a parent deck, then click and drag the decks accordingly. Alternatively, you can use the following case-sensitive format when naming a deck:
Parent Deck::Subdeck::Sub-subdeck
Sync {{Y}}
Sync your decks to the Anki web to save your back ups. Additionally, if you have the Anki app for iOS or Android, then you can use this feature to make the decks on your personal device match those on your computer, or vice versa. To do this, first sync and upload to the AnkiWeb from one device, then sync on your other device and choose download from AnkiWeb to match.
Stats {{T}}
Use this feature to see data on how well you’re performing. Although, you likely won’t have any meaningful data until you’ve used Anki consistently for at least one month. I personally like to check my stats every week or so.
Add {{A}}
This window is exclusively for creating and adding new cards to decks. This window is commonly open while studying if you’re not using pre-made decks. More on creating new cards later.
Browser {{B}}
This is where you go to search for and edit your cards. Filter cards by tag or deck in the left sidebar, depending on how your cards are organized. If you make a mistake while editing, then you can undo with {{Cmd+Z}}, or select 'Edit'>'Undo [action]' from the Menu Bar. I like to use toolbar because it shows me the action it will undo.
Reviewer
This is where the active studying takes place when you open a deck to review the cards. If you study from a parent deck, then you will be shown all relevant cards from the subdecks.
Use the spacebar to flip the card over, or click ‘Show Answer’ if you want to study at a snail’s pace. Then select one of the following after seeing the answer: Again {{1}}, Hard {{2}}, Good {{3 or spacebar}}, or Easy {{4}}. This is when the algorithm that makes Anki so powerful comes into play, but we’ll discuss that more later.
Use the options button in the bottom right corner to make adjustments to cards, if needed. Notice the shortcuts are displayed next to the options.
Click edit {{E}} to open the Editor for the current card. Click ‘Decks’ {{D}} at the top to return to your decks.
Menu Bar
While the Decks window is selected, the Menu Bar at the top will display the following options:
Anki>Preferences
You’ll want to make a couple changes here in order to optimize your Anki experience. See my preferences below:
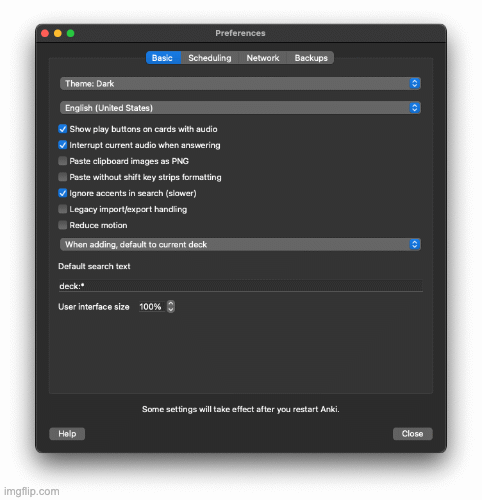
Many of the options are self-explanatory, but a couple are worth mentioning here.
Show next review time above answer buttons is recommended since it shows you the card’s new interval if you were to choose that answer. This will make more sense after reading the section below on the algorithm.
The Learn ahead limit allows you to see cards up to X minutes in advance. For example, if you have a card that isn’t due for another 20 minutes, and your learn ahead limit is 15 minutes, then you must wait 5 minutes before Anki will show you that card (I don’t like waiting, so I make mine ≥20 minutes).
Night mode, of course, is a personal preference. You’ll have to restart Anki to see the effect.
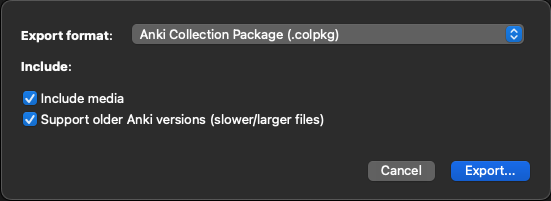
File>Export {{Cmd+E}}
Always keep backups of your decks. I like to export a backup to my external hard drive every weekend just to be safe. Anki stores my entire medical school education; I protect it with my life.
Also, be sure to export a backup immediately before making any major changes to your Anki (e.g. editing note types). Worst case scenario, if something goes terribly wrong, then you can safely undo your mistake by restoring from a backup. Otherwise, you could potentially ruin a significant chunk of your study material.
Use these settings when exporting backups:
Tools>Add-ons {{Shift+Cmd+A}}
This is where you spice up your Anki. There are some brilliant people out there who have created add-ons that make Anki function better for different uses.
If you're curious, you can explore all the available add-ons on the AnkiWeb. When you’re at a specific add-on’s page, scroll down a bit until you find a set of unique numbers in a box. To install the add-on on your Anki, open the add-ons window, click “get add-ons”, copy/paste the unique numbers from the box and click ‘OK’. After a successful installation, you must restart Anki for the new add-on to take effect (this is a recurring theme).
To adjust the settings of an add-on, click ‘config’ in the bottom right corner of the add-ons window. Some add-ons may not have settings at all, others require editing. To toggle an add-on off or on, click ‘toggle enabled’ in the bottom right. Again, you may have to quit and reopen to see changes.
Tools>Manage Note Types {{Cmd+Shift+N}}
Be careful here! This is where things can get dicey. If you don’t have html or css coding experience, then you probably want to avoid this for now. But this is where you go to edit note types and do things like modify the font color and formatting. Don’t forget to export a backup!
This is teetering on being part of the 80% of Anki that you don’t need to know. However, I think it’s important you know where to find this window. You probably won't spend much time here anyway.
Terms and Commands
Notes vs. Cards
Notes are basically a template from which cards are created. A note is not a card; cards come from notes. One note can be the parent of multiple cards, most commonly seen with cloze deletion note types. In a cloze deletion, the c in {{c1:: } stands for card. More on this later.
Import & Export
To import a new deck, simply double click on the file once it’s downloaded to your computer. It’ll automatically import into your Anki.
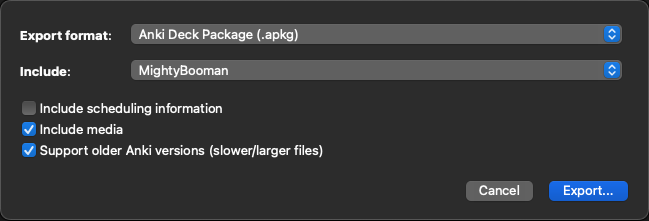
To export a deck from the Deck screen, click on the gear icon next to the deck of interest and choose ‘Export’ using the settings below.
Suspend vs. Unsuspend {{Cmd+J}}
Imagine your Anki as a tangible deck of cards that is stacked thousands of cards high. The unsuspended cards are in your hand so you can actively study them. The suspended cards are excluded from the active deck in your hands and placed off to the side.
From the browser, suspended cards will be highlighted yellow.
Bury {{-}}
Let’s continue the tangible deck analogy from above. Pretend you are doing flashcards in real life, and as you are picking up the next card to read the front, it slips from your fingers and falls backside-up in your lap. You saw the answer before you even had a chance to think about the question. This is when burying comes into play. Burying is akin to taking that dropped card and putting it in tomorrow’s deck.
Bury a card by clicking ‘option>bury’ while in the reviewer, or use the shortcut {{-}}. The algorithm is not affected and you get another shot at testing yourself tomorrow.
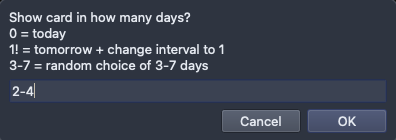
Alternatively, what I like to do in this case is use the shortcut {{r}} while reviewing and choose to bury the card for 2-4 days (see image below). Note, using ! will reschedule the card's due date and change its interval; avoid using it until you understand the algorithm.
Marking & Flagging
Marked and flagged cards will show up as a different color in the browser. This is useful when you’re reviewing your cards and want to return to a card later without disrupting your study flow.
Click ‘Option>mark’ or ‘Option>flag.’ You’ll notice that there are 7 different colored flags; the shortcut for flags is {{cmd+1}} for red, {{cmd+2}} for orange, etc. You can rename each of them by right clicking and selecting ‘Rename’. Some ideas for flag names are “Edit”, “Review”, “Add Image”, “Duplicate”, and “Delete.”
Tags {{Cmd+Shift+A}}
If you’re super organized and type-A like me, then you’ll love this. This is the best way, in my opinion, to organize your cards across multiple different decks. Tags can be seen in the left sidebar of the browser. As you create cards, or unsuspend notes from pre-made decks, you might consider tagging them as you go so you can quickly find and/or share them in the future.
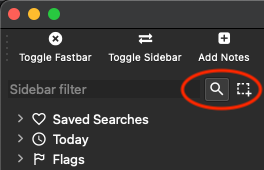
Tagging cards follows the same format as naming decks above (e.g. School::Year::Semester::Class::Lecture). Also, like decks, you can click and drag tags to easily create parent tags and sub-tags. Toggle between the search and selection tools in the top left corner of the Browser (see image below). However, unlike decks, tags cannot have spaces in them, so use characters like ‘-’ or ‘_’ instead.
To share only cards with a specific tag, rather than a whole deck, use the search tool while selecting the tag of interest, then select all {{Cmd+A}} cards. Go to Menu Bar and select Notes>Export notes {{Cmd+Shift+E}}. Note: if you use custom filtered decks, then make sure to empty decks from the deck screen first!
Additional Setup
We’re almost done with the basics. There’s just one last thing I want to cover before we get into the nitty gritty, and that’s downloading a few helpful add-ons. I think this is easier to understand after you install them and see for yourself.
Use the instructions in the Tools>Add-ons section above to download the following add-ons. I’ve tried to make this as easy as possible for you. Copy/paste the unique add-on ID to the right of each add-on below into your Anki.
Below are 6 game-changing add-ons that I think everyone should get, especially medical students. I’ve provided a brief summary for each, but I highly recommend that you read about them on the Anki website to understand their full capacity.
- Fastbar- with nightmode support (46611790): This adds an intuitive fastbar to the browser window that makes navigating the Browser much easier, especially early on while you’re still learning where to find certain commands and what the shortcuts are.
- AnKing Note Types (Easy Customization) (952691989): Game-friggin-changer. I love it for two reasons: (1) It makes it much easier to customize the colors and function of note types; (2) The timer feature in particular increased my speed immediately. I went from ~5 to ~8 cards/min. This may not seem like much, but when you’re doing 500 cards every morning, this adds up (if my math is correct, this saves me ~4.4 hours per week!!). If you’re just beginning with Anki, try starting with the timer at 15 seconds and shorten the interval as you feel more comfortable. For reference, my timer is at 5 seconds. I recommend watching the Anking’s video on how to use this add-on, here, as it requires some extra steps.
- Image Occlusion Enhanced for Anki 2.1 (alpha) (1374772155): This allows you to make image occlusion cards which are super helpful for things like gross anatomy and biochem pathways. More on this later.
- Customize Keyboard Shortcuts (24411424): This is important because, as you probably guessed, it allows you to edit the keyboard shortcuts. You don’t have to change any settings after downloading. Just know that some add-ons might have default shortcuts that will conflict with others. You can resolve that, and more, with this add-on in config settings.
- Edit Field During Review (Cloze) (385888438): I love this add-on. Note that it only works with cloze deletion note types. I find it irritating to have to open the editing window to edit a card whenever I find a typo or if I just want to quickly add something to a card. With this add-on you can simply cmd+click into the field you want to edit, and walla! chef’s kiss
- Special Fields (1102281552): This protects your personal edits to notes and cards from being overwritten when you import decks from others when you both have the same deck. To understand the importance of this add-on, you must know that every Anki card has a unique ID associated with it. If, for example, you and a friend have the same pre-made deck downloaded and you want to split the work of adding new tags to the cards for your school’s lectures, then you need this add-on to protect your personal cards. You can toggle between import and update settings as needed. You want to be on Import Tags settings all the time, unless you’re intentionally updating a deck or note type. This is critically important for updates to the Anking Overhaul decks — at least until the Anki Hub is released, which you can read more about on his website, here.
These are just a few of the 40+ I have. See Additional Resources below for more.
In Practice
Finally! We’re getting to the juicy stuff now. If you’ve been reading from the beginning, then now might be a good time to take a quick break, make a coffee or tea, and hold on to your horsies because the algorithm is a doozy.
Creating Cards
This is all done through the Add window and is pretty straightforward. Select the note type and deck, add your tag(s), and you’re in business. The real decision here is which note type to use, and when to use them.
Basic Note Types
Basic notes follow the traditional flashcard format. The front is the question and the back is the answer. Not much else to say here.

Cloze Note Types
Cloze notes are a bit different. The front is the question with the answer hidden by [...], and the back simply reveals the answer. To create a cloze deletion, highlight the word or phrase you want to hide and click the cloze deletion button in the toolbar, or use the shortcut {{Cmd+Shift+C}} — you’ll use this one all the time. A cloze deletion is the part of the card that is contained within this thing: {{c1::}}.
When creating cloze deletions, try to be as precise as possible. Also, try to limit the amount of cloze deletions per card. For example, this note with 3 cloze deletions will create 3 cards:
{{c1::Salmonella typhi}} is the most common cause of {{c2::osteomyelitis}} in patients with {{c3::sickle cell}} disease.
Experiment with cloze deletions and see what you can do. Creating good cards takes practice.
Pro tip: Use hints! A hint will be visible on the front of the card to help give you some context. For example, one card might be “[...] are associated with osteomyelitis.” That could be a lot of different things. Add a hint to make the card read “[which 2 bacteria] are associated with osteomyelitis.” Now I know I’m supposed to focus on two specific bacteria.
Image Occlusion Note Types
The front of the card is an image with occlusions, or boxes that are blocking something. The back will remove the occlusion(s). To create a card like this, click on the image occlusion button, or use the shortcut {{Cmd+Shift+O}}. Upload the desired image using the pop-up window. Then, simply click and drag the boxes to block something on the image. You can toggle between the Select Tool {{S}} and the Rectangle {{R}} by clicking the icons on the left sidebar. Each box will create one card. To add the cards, choose one of two self-explanatory options on the bottom right: Hide All Guess One, or Hide One Guess One.
Pro Tip: You can group multiple occlusions together and have them behave as one occlusion to limit card count. Using the Select Tool, click and drag to select the occlusions you want to group together. Then, click the Group Elements {{G}} button at the top of the window.
Pro Pro Tip: You can bypass the pop-up window by capturing the desired image as a screenshot to your clipboard first. If you’re on a Mac, the shortcut is {{Cmd+Shift+Ctrl+4}}. Click and drag to take a screenshot that will save to your clipboard. Then, go to Anki and use {{Cmd+Shift+O}}. You’ll be immediately taken to the editor with the image from your clipboard.

Learning Steps and The Algorithm
This section is imperative to understand. The algorithm is the key feature of Anki — what makes the spaced repetitions personalized and effective. I’ve done my best here to simplify this section as much as possible. It may seem complicated at first, but if you take the time to understand it, then you can make Anki work much better for you.
Options Settings
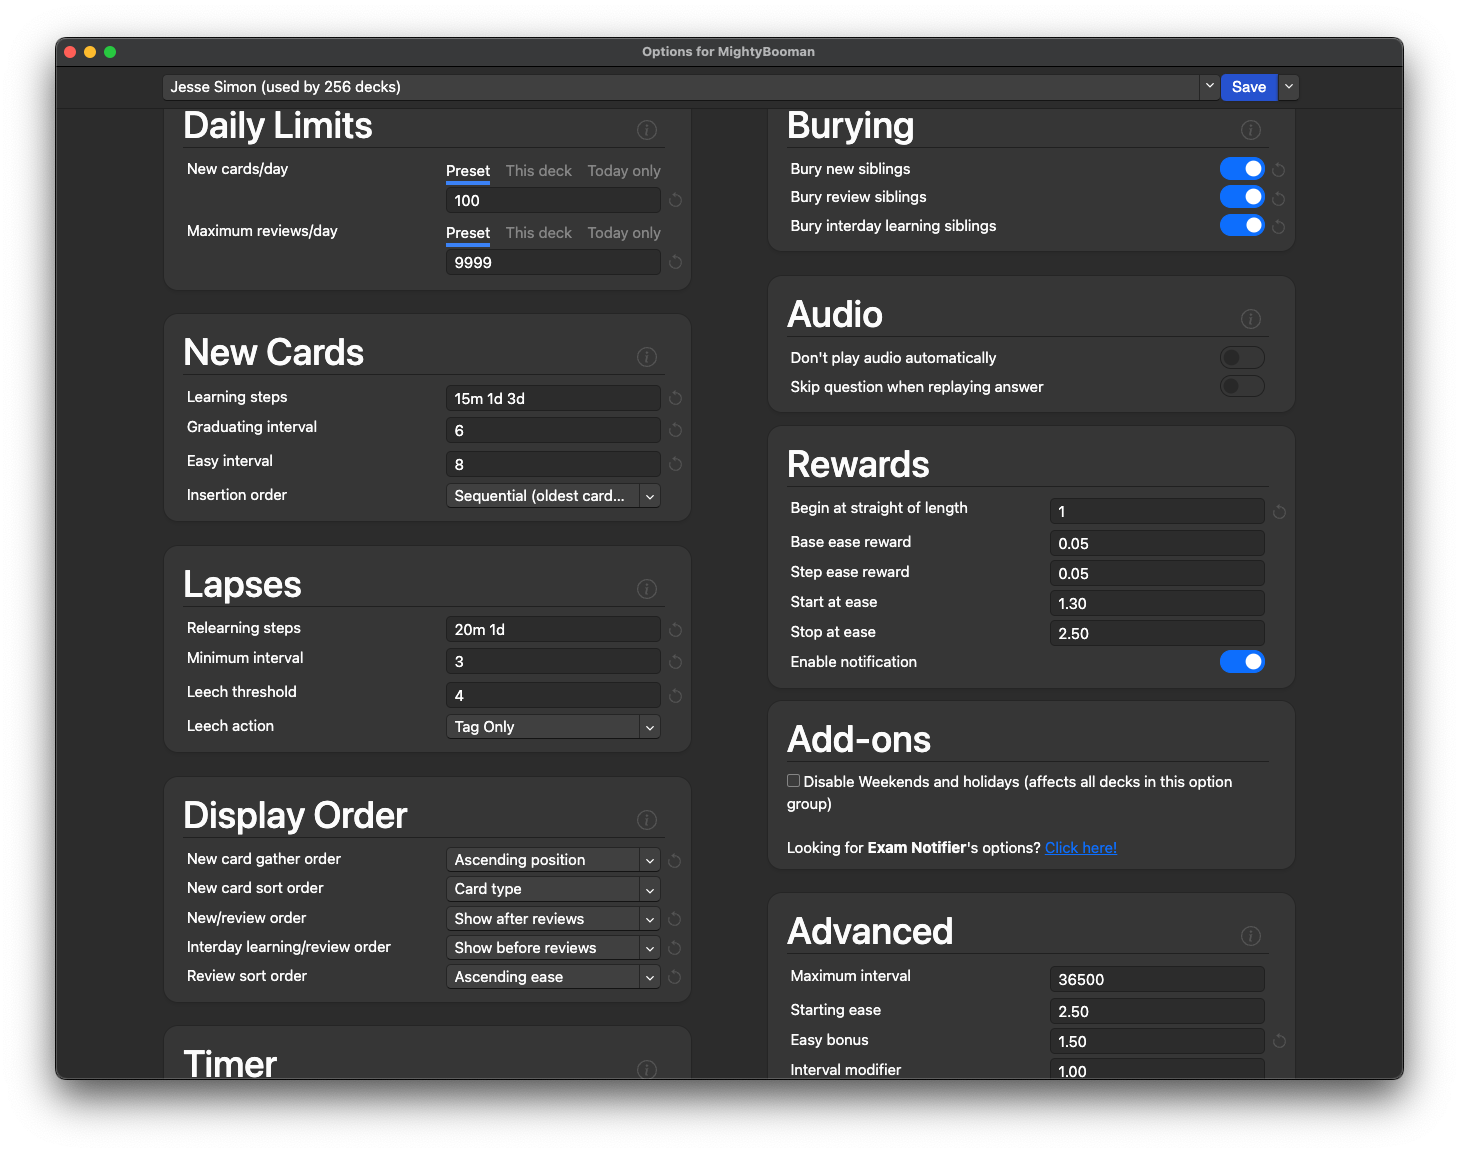
To start, there are settings that you must apply to your decks in order to tailor the algorithm to your personal learning pace. To do this, go to the options settings by clicking the icon to the right of a deck on the Home Screen, then choose ‘options’. Click the dropdown arrow in the top right, select Add Preset and name it.
Below is a screenshot of my settings. They’re based on a combination of online resources. You can read more about each setting by hovering your mouse over the info icon. When you’re done, select “Apply to all subdecks” from the dropdown arrow. You’ll have to do this every time you create a new deck.
Big Picture
All new cards within a deck follow the custom learning steps from above and progress through 4 stages: New, Learning, Review, and Mature.
- New: The card has been unsuspended for the first time and has never been answered before.
- Learning: After a New card is answered positively, meaning you select ‘Good’ on the back, it advances to the Learning stage. Think of this as the ‘Memorizing Stage’. In this stage, if you get a card wrong and select ‘Again’, then you will simply reset the learning steps. While in Learning, the card’s ease factor is protected. A card remains in Learning until it passes the final learning step that you set for yourself — the Graduating Interval. If you copied my settings, then this is when you select ‘Good’ at the 6 day interval.
- Review: This is the point after which the card has advanced beyond the Graduating Interval. Think of this as the ‘Memorized Stage’. At this point, you should know this card. Therefore, if you get a card wrong and select ‘Again’, then you will follow the Relearning steps and decrease the ease factor. This is called lapsing. More on this below.
- Mature: A Review card with an interval ≥21 days.
The Algorithm
Again, the algorithm does not begin affecting cards until they enter the Review stage. You set the learning steps, and Anki sets the Review steps. This means that you could hit the ‘Again’ button 100 times on a card with no consequence to the ease factor as long as the card is in the Learning stage. Once it graduates, then your selection can affect the card’s ease.
The Again, Good, Hard, and Easy buttons have different effects on a card’s new interval and ease factor:
The interval (ivl) is the number of days until you see the same card again. A card’s default ease factor is 250% and will change depending on your button selection. You can effectively ignore the interval modifier since it’s value is 100% (or 1). The starting ease, easy bonus, new interval, and hard interval can be edited in the Advanced options settings (see above), however I don’t recommend changing these.
Examples
Using my learning steps and settings from above, the following table demonstrates what happens to a card as it progresses from New, to Learning, to Review (read it from left to right):
Notice how the card has no ease factor until it graduates from the final learning step at 6 days. While in learning, a card is protected and, therefore, its ease does not change if you forget the card. If I were to continue selecting ‘Good’, then we would simply multiply the current interval by 2.5 until the interval reached ≥180 days (6 months), since that is the maximum interval in my settings.
In the next few tables, I’ll show what happens to a mature card over time after choosing each option:
Hopefully it’s easy for you to see how the change in ease factor will either make a card appear more or less often. If you’re still with me, then try to imagine what would happen if you had hundreds of cards with a low ease factor. It means you’ll see those hundreds of cards more often. That is not good. There are too many cards to do — we don’t have time to do more cards each day.
What I’ve just described is something called “Ease Hell”, which is when a significant number of cards have a decreased ease factor. To avoid Ease Hell, make sure that your learning steps are working for you. Utilize the Stats feature in Anki to see where you’re at. After at least one month of Anki, if you find that you’re lapsing often, then you might want to consider adding a learning step to provide yourself with more time before your cards graduate.
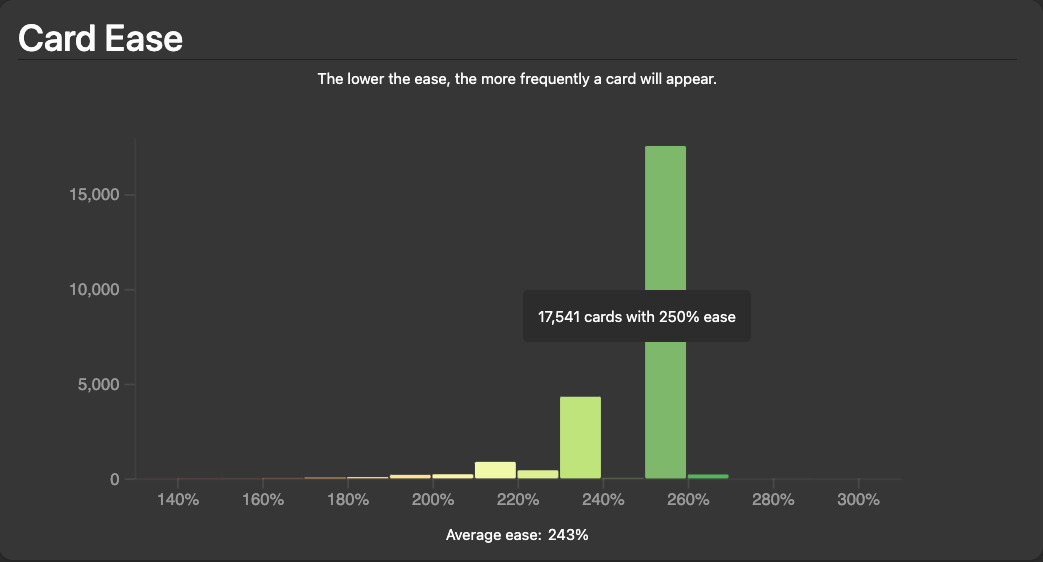
Using Stats
My stats heading into the Winter semester of M2 are below. My average ease is 243% — cool. But notice that I have many cards that are <200% (some as low as 130%). Don’t be afraid to lapse.
My Recommendation
If you’re just starting with Anki, try to limit yourself to either the ‘Again’ or ‘Good’ buttons only, and be honest with yourself. If you don’t know it, then click ‘Again’ — don’t be afraid and trust the algorithm.
Only push ‘Easy’ if it is seriously easy because you will see that card less often moving forward due to the easy bonus. Know that, if you copied my settings, and select easy on a learning card, then it automatically graduates since the easy interval (8) is greater than the graduating interval (6).
Only select ‘Hard’ on mature cards that you want to see more often, if you answered correctly when flipping the card. Again, this will affect the ease interval and show you the card more frequently moving forward due to the decrease in ease factor.
Finishing Thoughts
Miscellaneous Tips & Strategy
- The #1 rule is to use Anki every day. Some argue against this. I think it depends what your goals are. Bottom line is that if you commit to using it every day, then you will remember much more. It’s like working out — if you stop while on vacation then you will feel weaker when you get back. If you do it every day, then you will perform better on exams.
- Treat Anki as a remembering tool, not a memorization tool. To get the most out of Anki, learn & understand the material first, then create/unsuspend the relevant card(s).
- I like to do my Anki reviews as soon as I sit at my desk to begin studying. It takes a lot of brain power to remember everything I’ve learned in medical school so I save all my brain juice for my reviews. If Anki is going to be your primary study tool, then you’ll want to prioritize getting your reviews completed each day.
- Use a controller! I use an 8BitDo Controller. It makes doing Anki much easier and more comfortable. (You can also use a Nintendo Switch JoyCon.)
- If a pre-made deck does not already exist, then I try to limit myself to creating ≤30 cards per lecture in order to keep the overall card count low (sometimes this isn’t possible).
- Each note type will have different fields (i.e. Front, Back, Lecture notes, etc.). The Front, Back, and Extra fields will always display by default, whereas the others (i.e. Lecture Notes, First Aid, Pathoma, etc.) will be closed until you manually open them on the back of the card by either clicking on them, or using the shortcuts h or ‘. Alternatively, you can use the Anking Note Type add-on mentioned above to make certain fields automatically open.
- As you begin to use Anki regularly, keep an eye on your total review count — it should typically be less than 600 per day on average. Any more than that and you’ll start to resent doing your reviews because it’ll take way too long. Keep this number low by limiting the number of new cards you create for each lecture; or if you’re using pre-made decks, try not to unsuspend more than 100 new cards per day. You can tweak these numbers as you like as you get more comfortable with Anki.
- As soon as you finish creating cards for one lecture, or unsuspending cards from a pre-made deck, I recommend immediately testing yourself and review those new cards before moving on to the next lecture. I find that this keeps the volume of new content digestible. However, ultimately, you should find and establish a workflow that works best for you.
Additional Resources
If you’re looking for some great pre-made decks, here is a list of the decks I use:
- Anking Overhaul v11 for high yield Step 1 & 2 material
- DO Demeter Deck v4 (based on Savarese) for high yield OMM material (for osteopathic students)
- DOPE Anatomy for gross anatomy
- 100 Concepts for additional high yield anatomy
- The Only EKG Deck You'll Ever Need for EKGs
- Netter Neuroanatomy for Neuroanatomy
Other Resources:
- Video: Anking’s 40+ add-ons in 5 min. This is awesome. Choose the file in his Google Drive that matches your version of Anki. It appears that he updates these so save the link for later.
- Anking Membership: The AnKing and the team put a lot of work and money into improving medical education through Anki. I recommend supporting them by purchasing a membership. It comes with several cool add-ons to beta test, as well as opportunities to get specialized help.
- AnkiHub: Another resource offered by The AnKing team. Although expensive, I highly recommend it. This revolutionary add-on allows for real-time collaborative deck updates. This ensures that all information is accurate and up to date.
If you like data then you should consider getting these additional Add-ons:
- True Retention (613684242): After using Anki for about a month and having enough mature cards, you’ll be able to see some additional useful data. True retention will help show you how well you’re remembering information. Studies support that retention rate should be at ≥85%. Anything above that and it’s the law of diminishing returns — you’ll likely have to spend a significant amount of extra time learning for a marginal percent increase. If you’re at 85%, rest easy. If you’re below, then consider adjusting your learning steps so that you see cards more frequently before they graduate, or consider adding an extra learning step. At this point, you’ll have to understand the algorithm in order to make proper adjustments. To use, Shift+click on the Stats button on the Home Page.
- Review Heat Map (n/a): You’ll have to follow the instructions from the link in order to install. It’s fun, it’s pretty, it’s motivating. This add-on will display a calendar view of your Anki streak with data on how many cards you did each day.
That’s it! You’re ready to rock and roll. Happy studying!
Edit: March 2022
Anki In Action
I made a video in which I talk through some of the skills outlined above. Topics I cover include: How I Organize My Anki, Custom Filtered Decks, Exporting Tagged Cards, How I Use Pre-made Decks, and How and When I Create Cards.


Comments ()